Category Archives: Uncategorized

Day 10 – More functions to explore

You have now been introduced to all of the basic things that RefWorks does.  However, there is much, much more to it and it offers lots of different functions that you may find useful.  You could happily use it as we’ve outlined already and you would be at no disadvantage compared to others.  If there is something else you wish it could do though, it’s worth looking at the software in more depth, as it may well do so already!  Here are just a few examples:

RefGrab-It: This is a tool that allows you to transfer information from websites in to RefWorks, including book details from sites such as Amazon. Available in the ‘Tools’ menu.

Share folders with other RefWorks users: You can nominate people with whom you can share parts of your RefWorks library.

Duplicates: Check for duplicate records and remove them if you wish.

Add notes to records: You can add personal notes to any reference record.

Mobile interface: If you want to use RefWorks on your phone or use a stripped down version on your tablet, there is a mobile version at www.refworks.com/mobile

If you want to investigate any of these further, but want some advice, or if you just want to find out more about any of the functions already covered, your Academic Liaison Librarian would be happy to help.

Remember, RefWorks will be available to you for as long as YSJ retains its subscription (which we plan to do for some time to come!), even once you have graduated.  So, if you start using it now, you could build up a valuable resource for years to come.

Accompanying video: https://hml.yorksj.ac.uk/Play/5226

Day 9 – Citing and creating references in Word

As you write your research projects up, you will want to insert citations as you go along, especially after quoting the work of someone.  If the work to which you are referring is already in your RefWorks library, you can insert it straight into Word.  Once you click on the RefWorks tab, you will get this menu:

RefWorksWordMenu

If parts of this menu are greyed out, it means the tab has not logged in to your RefWorks account.  There is a reminder of how to do this in the Day 8 section of this guide. Try to make sure that the style matches the one you need (i.e. York St John Harvard) – use the drop down menu to choose this.

To insert a citation, click on the ‘Insert Citation’ menu and you can then pick the reference you want from your library.

CitationWordMenu

The preview will show you how the citation will look.  If you want to change it, use the options given to help you do this.  For example, to change the page numbers, use the ‘suppress pages’ option and then use the suffix option to type in what you would prefer.  It can take a bit of time to get used to these options, but it is worth persevering in the long run.

When you have finished your assignment, move the cursor in Word to the point at which you would like to enter the reference list or bibliography.  Then, click on ‘Bibliography Options’ and ‘Insert Bibliography’.  A full list of the references you have cited will appear, in the referencing style you have picked.

Accompanying video: https://hml.yorksj.ac.uk/Play/5220

Day 8 – Linking to Word

Once you have built up your RefWorks library, you can link it to Word to allow the automatic insertion of citations and a bibliography.  This is an add-on feature to RefWorks called ‘Write N Cite’ and is completely optional.

In Word, you can see a number of ‘tabs’ across the top of the screen, each containing a menu.

RefWorks offers you the opportunity to add its own tab to this.  On University computers, the RefWorks tab will have been downloaded to Word for you and all you need to do is link it to your account.  To download to your own device:

  • Log in to RefWorks
  • Click on the ‘Tools’ menu and then choose ‘Write N Cite’
  • The ‘Downloads’ menu will offer you links to download, save and run the relevant version of the Write N Cite software for your computer’s operating system
  • Follow the on-screen instructions for installation and the RefWorks tab will appear in Word (NB You may have to restart your computer for this to take effect)

You now have the tab installed in Word. It will be labelled as ‘RefWorks’ or ‘ProQuest’:

RefWorksTab

Now you need to link Word to your own RefWorks library.  The easiest way to do this is to go back to the ‘Write N Cite’ menu in RefWorks (via the Tools menu, as above) and copy the long code which is supplied:

LongCode
Now, in Word, go to the RefWorks or ProQuest tab, click ‘Log In’ and paste this code in the relevant box:

RefWorksLoginWord

You can now use RefWorks to cite and create bibliographies in Word.

Accompanying video: https://hml.yorksj.ac.uk/Play/5219

Day 7 – Creating a bibliography

One of the key things you are likely to use your RefWorks account for is to create a reference list or bibliography.  As has already been discussed, a major part of avoiding plagiarism is providing a reference with the necessary information to allow the reader to recognise and find the work of anyone else that you have used.  Therefore, it is very important, before creating a bibliography in RefWorks, that you have filed resources under the correct item type, that you understand the key fields required for each type of resource and that the records are populated accordingly.

You will need to select the resources you wish to include in your bibliography.  The easiest way to do this is to copy all of the relevant references into a folder.  Alternatively, you can just select the ones you want from a longer list.

  • Select the folder from which you wish to make the bibliography
  • Click the ‘Create bibliography’ button
  • Check that RefWorks is picking up the relevant folder and that it is including the references you need
  • Check that the correct referencing style is picked (this will usually be York St John Harvard)
  • Click ‘Create bibliography’
  • Some browsers’ pop up blockers will stop it appearing immediately: use the prompt in the bottom right hand corner of the screen if this happens
  • Your bibliography will appear

You can copy and paste this bibliography in to any document.

Please make sure that it matches the guidelines of whichever referencing style you are using before you submit a bibliography in an assignment.  It is your responsibility to ensure the outcome adheres to the relevant standard.

Accompanying video: https://hml.yorksj.ac.uk/Play/5218

Day 6 – Creating folders

Over time, your RefWorks library will build.  Rather than searching through hundreds of records to find the one you want, you can set up folders.  It’s up to you how you organise your references, but one popular way is to do so by assignment, so that your reference list for it is already built when you come to hand in time.

Think of the title of an assignment or module you have coming up.  You can now create a folder within RefWorks and store any references you want to use in that in one place.

To create a folder:

  • Click the ‘New Folder’ button
  • Enter the name of the folder you want to create in the box
  • Click ‘Create’
  • The folder will now appear in a list on the right hand side of the screen

You can create as many folders as you like.  You can then populate them by simply dragging a record across to the relevant folder, or by selecting records and using the Folder menu to transfer them.

Folder menu: FolderMenu

Whenever you create or transfer new records in to your RefWorks account, you will also be given the option of transferring them directly into any folder that has been created.

You will always have your core list of references.  They do not change.  Putting a reference in a folder does not transfer it; it’s more like a copy is put in there.  You can therefore have the same reference showing in a number of different folders, as it may well be useful in multiple assignments or be relevant to more than one subject area.

You can always return to your core list of references by using the ‘References’ link in red near the top of the screen:

ReferenceMenu

Accompanying video: https://hml.yorksj.ac.uk/Play/5216

Day 5 – Altering a record

You may find that you need to edit a RefWorks record.  Sometimes, you may have entered some details incorrectly.  More importantly, it is very common for information to be entered into the wrong field when records are transferred from other search tools and you need to check if this has happened with yours.  When two systems try to talk to each other, they can sometimes get mixed up!

You can edit any record by clicking on this icon, which is on the right hand side of each individual record’s title:

EditIcon

Common errors encountered whilst transferring records include all of the publication information (i.e. place, date and publisher) going into the publisher field, instead of the individual ones:

ErrorPubField

You will need to separate these out if this happens to you:

PubField

Another one is the author information getting replicated in the title field, as well as the author one:

ErrorTitleField

Make sure there is only title information in there – delete the rest!

TitleField

Once you have finished editing the resource record, click ‘Save reference’ and close the window.

Accompanying video: https://hml.yorksj.ac.uk/Play/5209

Day 4 – Importing references from Discover

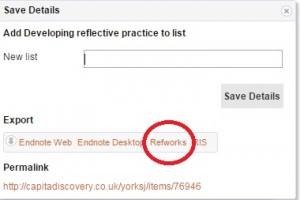
Most library search tools offer you the chance to transfer resource information in to RefWorks.  This means you often won’t have to enter records manually (although you can still do so if you prefer).  This example will show you how to transfer from Discover, one of the library’s search tools, but the same principles will transfer to other search tools too. For example, you can also export records from the library catalogue by clicking on the Save Details button.

Export from Prism

And then export to RefWorks.

Export to RefWorksPrism

When you search Discover, you have an option to save items to a folder.  This is a bit like putting your items in a shopping basket when you are purchasing things online.  This is the icon you need to look for:  FolderIconYou will find it at the top right hand corner of each record.  It will turn yellow once it has been clicked.

When you have decided upon all of the records you want to transfer, you need to access your folder.  You can do this by clicking on the ‘Folder view’ link on the right of the screen:

Import

  • Click the tick box to select all of the records and then click ‘Export’ from the menu on the right hand side of the screen
  • Select ‘Direct Export to RefWorks’ and then click ‘Save’
  • Log in to RefWorks, if prompted
  • The records will transfer in to your RefWorks library

Once you feel confident doing this, you can try it with any other library search tools you may use.

Accompanying video: https://hml.yorksj.ac.uk/Play/5202


Day 3 – Entering a reference manually

Each reference is made up of information from the original source.  These bits of information are then put in a set order, so that the reader knows which are which and can tell from the overall reference what type of resource has been used.

Common resource types are books, journal articles and websites.  An important thing to remember is that you reference first and foremost by resource type, rather than how it was accessed.  So, a journal article is referenced as a journal article, whether it was found online or in a paper version.  You can then add the fact that you found it online to that reference if you wish.  Finding the online version of a resource does not automatically make it a website.  If you find a resource online, try to discern what type of resource it is and then choose the reference type which links to that.  You will get used to the format types as you get more experienced with academic research.  If you are unsure about what type of resource you have found, you can ask your Academic Liaison Librarian.

Book references

A basic book reference is made up of the following parts:

Reference

These are the bits of information you will need to enter in RefWorks.  If you need more help on locating these in a book, this presentation may help: http://prezi.com/hhvluu3f9ld2/?utm_campaign=share&utm_medium=copy&rc=ex0share

To add a book records to RefWorks:

  • Make sure you are logged in
  • Click on ‘New Reference’
  • Choose ‘Book, Whole’ from the Reference Type drop-down menu
  • Enter the details from the book in the appropriate boxes (you should have the fields detailed in the diagram above as a minimum)
  • Click ‘Save Reference’
  • Close the ‘Add new reference’ window

Accompanying video: https://hml.yorksj.ac.uk/Play/5201


Day 2 – Adding the YSJ referencing style

You will come across lots of different referencing styles.  Essentially, they all contain the same core bits of information, but they are usually adapted to make sure they include things that are of additional concern to the target audience.  So, scientific research may use a style that differs from historical.  At YSJ, we have a referencing style that meets the needs of courses across the institution (the two exceptions are History and Psychology) and is based upon a standard that originated at Harvard University.

You can find guides to the YSJ referencing style in SMILE (www.yorksj.ac.uk/smile/harvard – web based) and on the ILS website (http://www.yorksj.ac.uk/ils/harvard/ – printable version).  We have also imported this to RefWorks, so that it will produce references in our style for our users.

As there are so many styles, you will need to tell RefWorks which is the one you need to use.

  • Log in to RefWorks at www.refworks.com/refworks
  • Click on the ‘Bibliography’ menu
  • Click ‘Output Style Manager’
  • Remove all of the existing favourites
  • Search for York St John in the top left box
  • Click on ‘York St John Harvard’ when it appears in the main box on the left
  • Click on the right facing green arrow to transfer it to your favourites
  • Close down the Style Manager box

Accompanying video: https://hml.yorksj.ac.uk/Play/5199

Day 1 – What is Refworks and creating your account

What is RefWorks?

RefWorks is a tool to help you collate the references of the resources you read and then put them in to the format required for your assignments.

Why reference?

Referencing is an important part of academic work.  If you use someone else’s work without giving them due credit, you are committing plagiarism.  Imagine if someone used a photograph or a piece of writing of yours, without saying where they got it from.  This wouldn’t be fair to you.  Referencing allows the author of a work to receive the recognition they deserve.

There are lots of conventions surrounding referencing, but the most important thing is to have the different bits of information any reader requires to find the original work.  If you reference something in an accepted format, any reader familiar with that format can tell what type of resource you have used straight away and then find it if they wish.

Create an account

By creating a RefWorks account at the beginning of your course, you can ensure you keep records of everything you read and then have the reference to hand whenever you need it.  You will need to access RefWorks via the ILS website to create your account, so it knows you are a member of our community.

  • Go to www.yorksj.ac.uk/ils/refworks
  • Click the link to log in to RefWorks
  • Enter your YSJ username and password (as you would for email and Moodle)
  • Click ‘Sign up for a new account’
  • Fill out the forms and create your account

You can choose a username and password that works for you and they will be valid beyond your course end date, for as long as YSJ retains the license to the service.  From now on, you can log in to RefWorks directly at www.refworks.com/refworks .

Accompanying video: https://hml.yorksj.ac.uk/Play/5198