A while back I waffled about displays. While gaining an hour today I thought it was time for a follow up. In the last waffle I looked at the planning and preparation part of my displays. In this waffle we grab the scissors and the staple gun and set to work!
When starting to put your display together on the wall, there are some key points that I try to remember. These are my own personal points and remember I am no artistic expert at all!
- Use the trimmer – Mounting work and images is very important to give that ‘professional’ and attractive look to the display. Getting all those edges perfectly straight and the same border width is where the trimmer comes in useful. When I was training, double mounting was the pinnacle of displays – even when resources were low, we would create novel ways to still achieve this including just creating a ‘frame’ around the back of the item to reduce the amount of paper being used. Nowadays, double mounting is still used but not always required. However, using the marks on the trimmers paper guide allows you to get not only a straight edge but always the same border width. It also prevents you having to take hours cutting out with the scissors. (Note – always make sure your tie is tucked in when you are trimmer – you can actually trim your tie as well! ). In the absence of a trimmer, be creative and go for a cloud or star burst effective around your work.
- Angle your stapler – When putting up the display, taking it down is probably not in your mind. But remembering that you are going to have to take every staple out will encourage you to edge your staple gun or attach some folded card to the underneath of it so that your staples protrude slightly from your backboard. This definitely makes removing the staples later a lot easier.
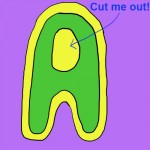
- Letter Stencils – One thing I could never do without was my letter stencil set. This allowed me to create large letters for the title quickly and easily while maintaining a constant size! Remember to draw round your stencils back to front on the back of the paper. This means that when you cut them out you won’t see the pencil lines. Having several sets of different sizes is also a good idea. One of my ‘pet hates’ with display lettering is when the centres of letters are not removed. These include the gap in the ‘e’ ‘o’ and ‘g’. Take the time with these and always try to remove them. It makes them look better and the letter looks correctly formed. If it is a very small gap to cut out, then cut through the letter and then when you put it on the display board, join the cut back together.
- Styles and sizes -Whenever I created a display I always tried to have a range of styles of writing on the board. These might include handwriting (both printed and joined), stencilled letters and computer printed text. Generally speaking, the higher up the board the bigger the text was. Following this, the children’s written work or small text should always be at the bottom of the board. This allows the children and my ever failing eyesight to easily read the writing.
Of course, this is not the perfect guide to display creation – it is just some useful techniques that I used in the past. Although creating displays was once one of the twenty five tasks that were removed from the ‘teacher’s’ responsibilities – they still were an area of my teaching that I enjoyed creating and then engaging with.
Remember keep up to date with my waffles by subscribing to;
Twitter
Blog
YouTube
Facebook
and now on iTunes!
Podcast
Have fun and catch you later!
